This crib was made using a mix of 17th century and modern techniques for working with green wood. A fairly large white oak tree died on my farm late last summer. In the spring my son and I cut it. The sap wood was beginning to get soft, but the heart was still solid. We pulled the butt of the log up close to the shop with a tractor. In this photo you can see the first cut from the log. The wood begins to end check soon after being cut so we have lopped off a section from each end.

We’ve left the piece a little longer than what we’ll need for bed parts. This section is called a bolt. I am pointing to the primary crack which seems to be present in every log. I’ve read many explanations for this: I still don’t know why it happens. You can actually see it in the end section that is lying close to the camera better than in the end of the log; the spalting of the sapwood is also clearly visible here.
When you break up wood to make fire wood you call it splitting. When you do it to make furniture parts it’s called riving. Here I’m driving a wedge from the side of the log to try to split the bolt along the primary crack.

And now the crack is beginning to open up.

More wedges are driven to extend the split the length of the bolt.

The next splits quarter the bolt. Always split along the radius at this stage. There were some knots at one end of the center that mad it a lot of work to separate the sections.

Here’s James showing off one of the quarters. You an see that knot just above shoulder level. The rest is pretty straight clear grain: just like the bark told us it should be.

We coat the ends with Anchorseal, which is a wax emulsion, to try to limit end checking: even though we’ve cut these pieces a little long we don’t want them to begin to check at the ends.

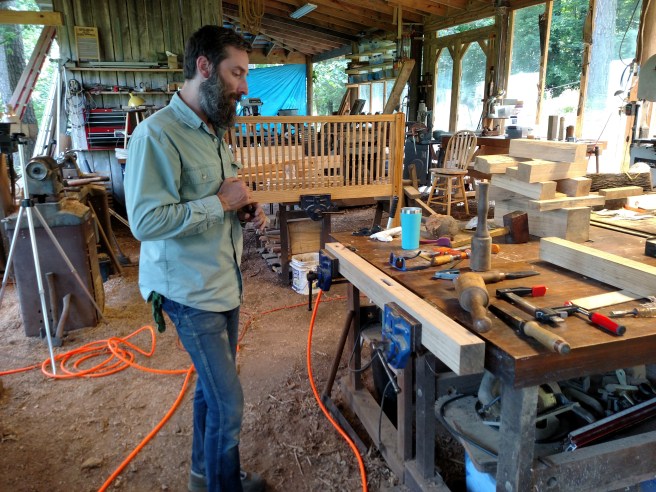
Now we take the quartered sections to the shop to continue working them into usable pieces. The legs and rails are the largest pieces so we’re going to make them first since we’re working on the largest section of the log. The first task is to joint one side to get a flat surface to work from. You can see in the above picture that this log yielded pieces with a slight twist to them.

Next we use the band saw to mill something close to the size pieces we need for these parts.

Here James is catching a piece as it comes off the saw: he’s only catching, not pulling. This is a little Delta 14″ bandsaw that I have modified by adding a riser block, large auxilliary table, and a larger motor to be able to do this work. You can see that we’re trying to get rid of the sapwood that has started to get punky. The jointed side is easier and safer to push across the table than a roughly split surface like the top.

A view from the back side shows that the band saw backs up to double doors so that it doesn’t need to sit in the middle of the shop.
Next it’s back to the jointer to square up the work. The piece James is jointing will make two legs.

We left these pieces slightly over sized in every dimension at this point. The most time consuming task in making this crib was to turn the spindles. There are 26 on each side and 14 on each end. All the spindles are around 21″ long so I cut some shorter bolts and these were riven using, first a wedge, then a froe to get closer to the final dimension.


You can see that I’ve split off the center section of this piece. The tree has lots of limbs when it is young. As it grows the lower limbs drop off, but they are still present in the center of the log near the pith. We want to get rid of this wood and use only the straight grained wood that grows later on. The froe is started by driving the blade with a big mallet, then the long handle is used as a lever to split the wood through.

The froe is usually lined up tangent to the annnular rings or along a radius. The blank is almost always riven in half to keep the split from running out toward the small side. Wood that has been riven in this way will yield blanks that have continuous grain running the length of the blank. This allows a thin spindle to be quite strong. One of the riven blanks is leaned up next to the piece I am working on. The pieces that have flaws like the piece on the ground that includes a small knot become firewood. On this bolt the sapwood was so punky that it was very difficult to split off, it would just break up, so I took it off of the outside pieces with the band saw.
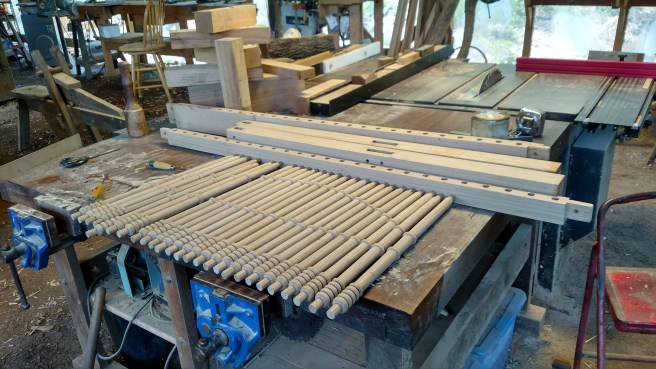
All of these spindles were going to have a maximum diameter of 1 1/8″ so since they were all going to be the same, I squared them up using the jointer and table saw. This is a step that is usually not necessary with riven stock. I cut them all 1 1/4″ x 1 1/4″. When they are mounted on the lathe they are never perfectly centered because the center points always want to follow the weakest grain. Then they are made round with the roughing out gouge and smoothed up with a chisel. A little bit of diameter is lost here as well. The pieces turned this way will be pretty close to 1 1/8″ in diameter. I don’t bother to measure this dimension as it won’t fit into anything: they just have to look alike. Here is one batch of spindle blanks squared up and cut to length: I’ve coated the freshly cut ends with Anchorseal.

On the other side of the can of Anchorseal are a couple of the roughed out rails.
Here’s a video of me turning one of the spindles. It’s unedited.
The fact that these blanks were turned when the wood was green, and that the wood had straight grain running the length spindle made them much easier to turn than if this had not been true. I left the tenons 3/4″ in diameter. I laid these spindles aside to dry while I finished working on the frame, and just before final dry fit I return the tenons to 5/8″.
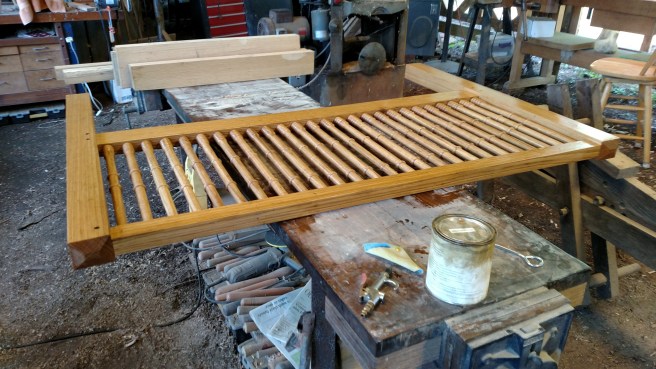
Here’s the design for the side panels laid out on graph paper. The row of beads just below the center line goes straight across. The upper row of beads describe an arc. This is a happy image for me: the sun and moon trace daily arcs across the sky, rainbows form arcs, portals may be arched.
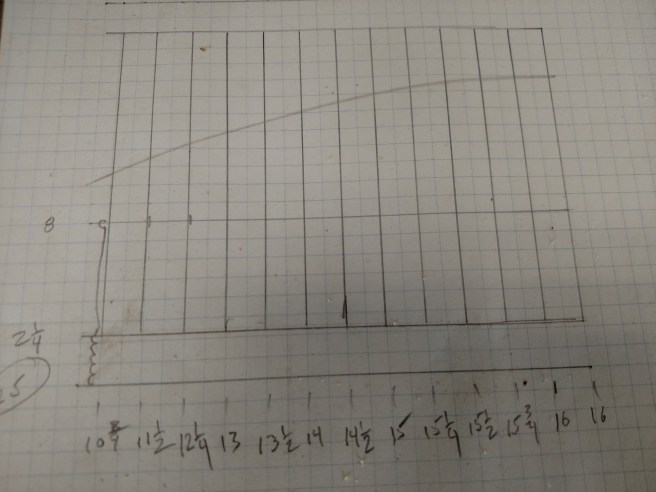
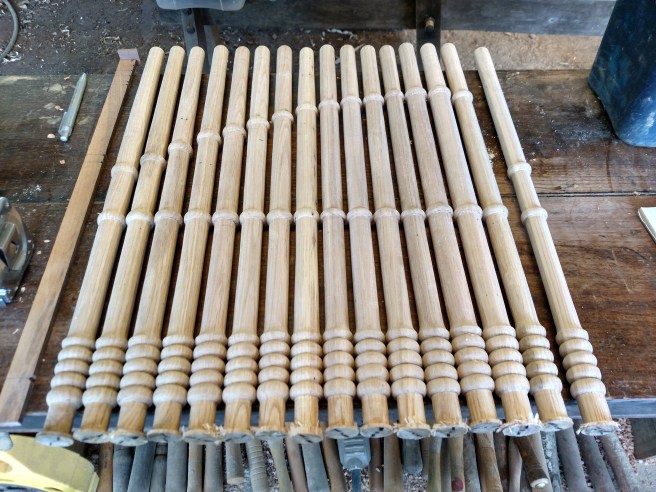
Here it is actualized. To the left is the story stick that I used to lay the design out on the spinning wood. In this photo it’s upside down: the stop is held against the bottom edge of the lowest bead for layout. The upper beads had to be individually measured. The first spindle for the second half is to the right.
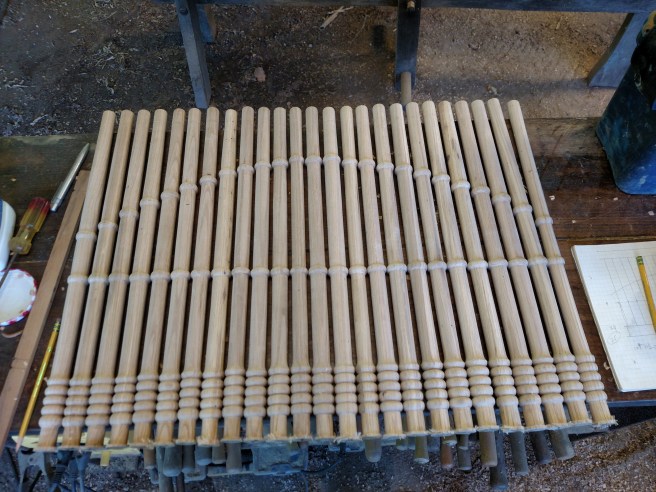
Full side – 1.
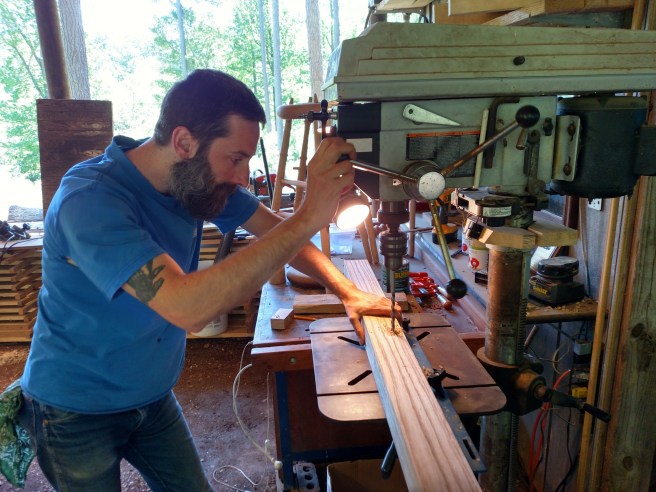
While these dried we finished working on the frame. We cut all the pieces to their final dimensions, then began on the joinery. First we drilled the waste from the mortises in the legs on the drill press. Here’s James thinking about how to proceed to clean out the mortise. You can see the first side finished in the vise on the other workbench behind him.
Now he’s getting to work.
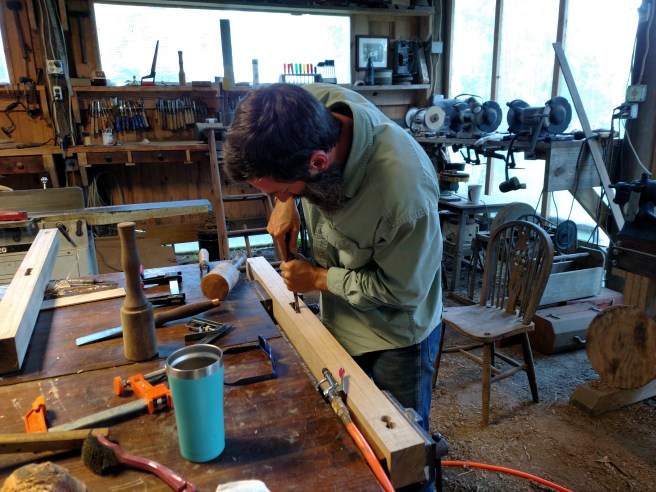
We’ve left the leg a little long at the top: the chisel can act like a wedge when cleaning out the mortise and we don’t want to split the leg.
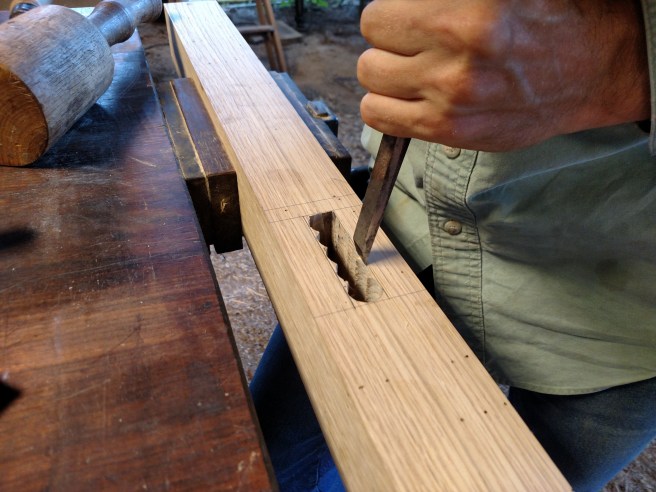
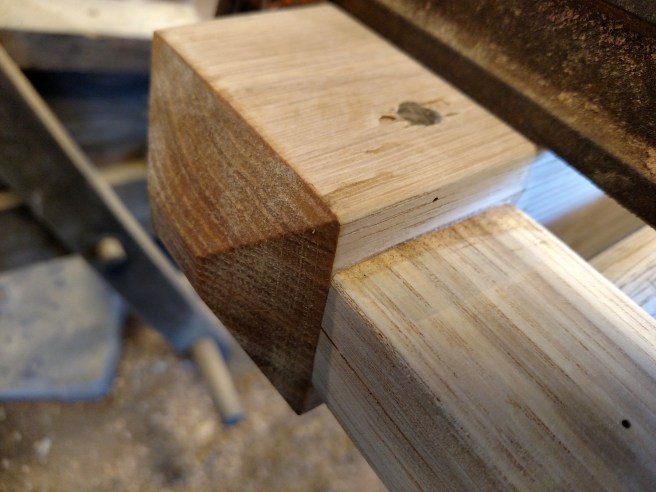
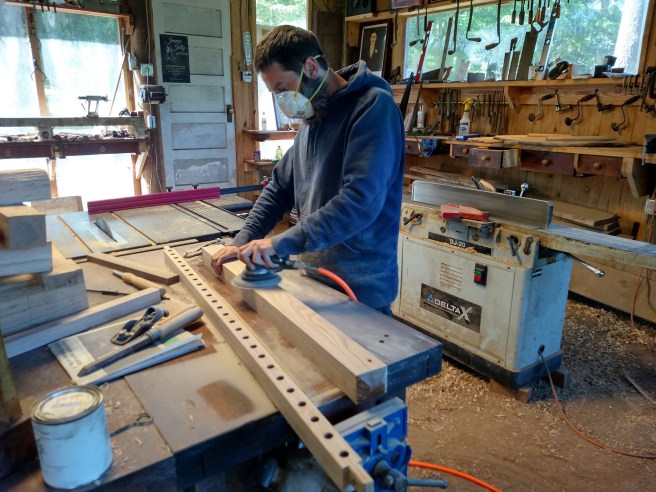
The tenons were roughed out on the table saw by setting the blade to the proper depth for the shoulders, then making many parallel cuts to make waste removal easy to make the cheeks. Here the cheek of one of the tenons is being finished with the rabbet plane.

Here’s the finished tenon. Note that all the corners are chamfered. This gives any small bit of waste that was inadvertently left and any excess glue somewhere to go at final assembly.
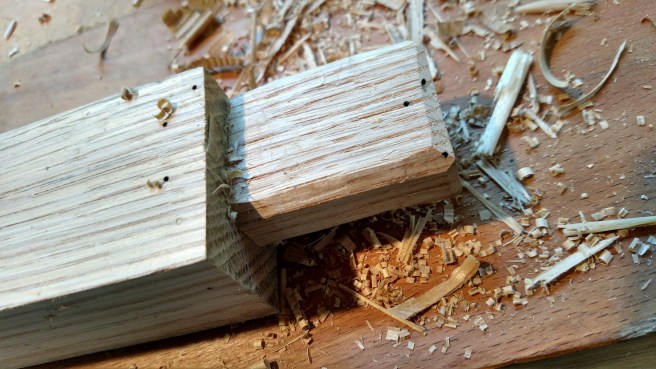
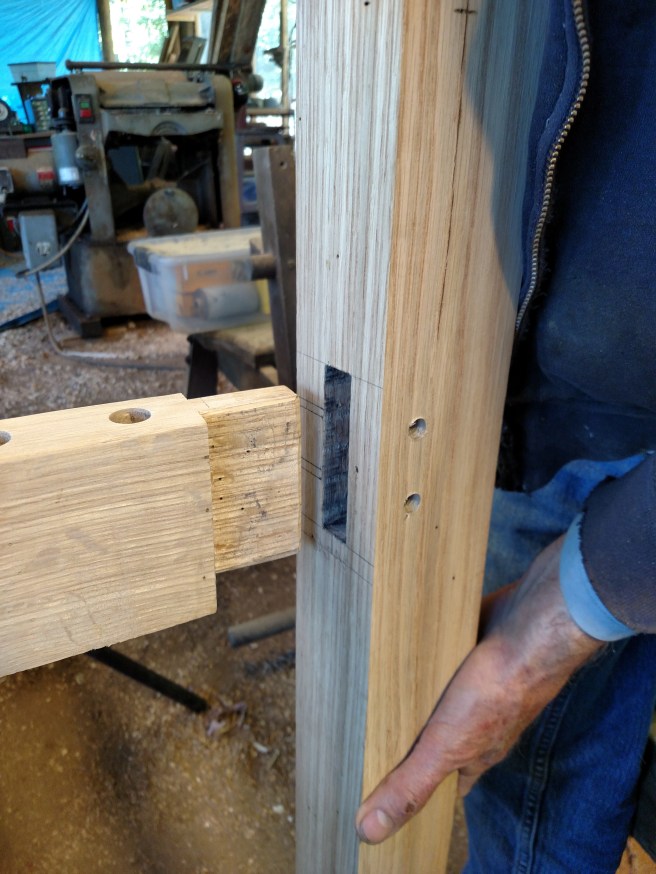
This is the top rail and the tenon is called a haunched tenon because the tenon does not go across the entire width of the rail. This is an added measure to insure that we don’t split the top of the leg. Using a haunched tenon in green woodwork also makes sure that when the rail shrinks as it dries the mortise won’t be exposed.
Bled a little for this project.
Getting a good tight joint requires some testing and a series of slight adjustments. Here’s the bottom rail being fitted. The haunch is at the bottom and is smaller: since we’re not near the end of the leg we’re not worried about splitting here.
Here’s the dry fit: I’m looking for a good tight mortise and tenon and tight shoulders.

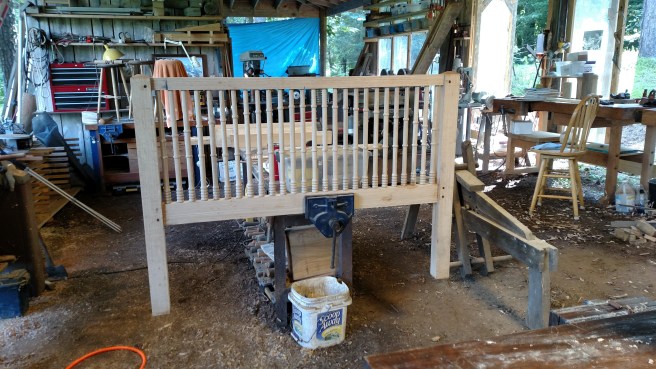
Here’s the same joint at glue up showing the leg cut to length: I haven’t put in the drawbore pin or cleaned off the excess glue yet. On a crib the legs are not allowed to stick up above the rails for fear that the child could catch some clothing on the protrusion and hurt herself.
I always dry fit the entire frame before applying glue to try to avoid nasty surprises at the last moment.

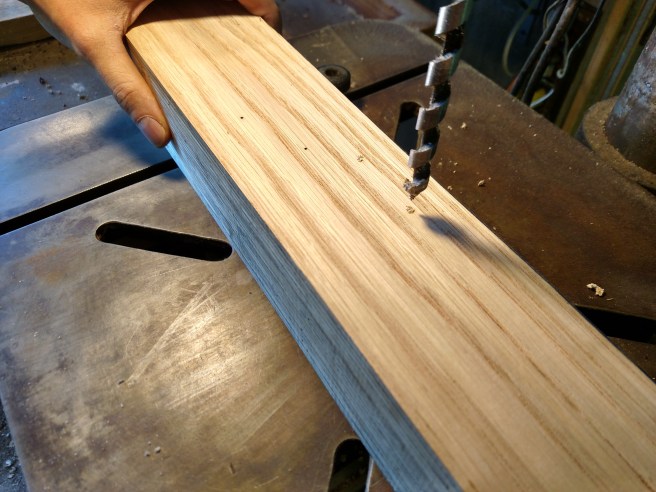
Now we drill the holes for the draw bore pins that will lock the mortise and tenon joints. The holes in the tenons are offset away from the shoulder to pull the joint tight as the green wood shrinks as it dries.
At some point I drill the round mortises in the top and bottom rails for the spindles and then return all the tenons to 5/8″. Right before assembly we go over the legs and rails to remove any dirt and layout marks.
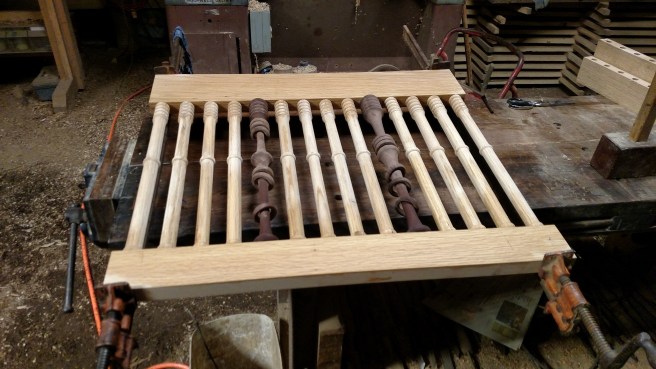
The spindles are checked to make sure that they’re clean when the tenons are returned. Here are all the pieces for one side laid out ready for glue. You can see the hole has been bored in the tenon for the pin that will lock it in place.
I use liquid hide glue, often referred to as chair maker’s glue because of it’s long open time, to join all these parts. First I glue in the bottom tenons on the spindles one at a time. I tap these down with a mallet to get them tight.

Next I put glue on all the top tenons, then lay the section down on the bench and tighten the top rail with bar clamps. Here’s one of the ends under clamps.
Finally, add the legs.

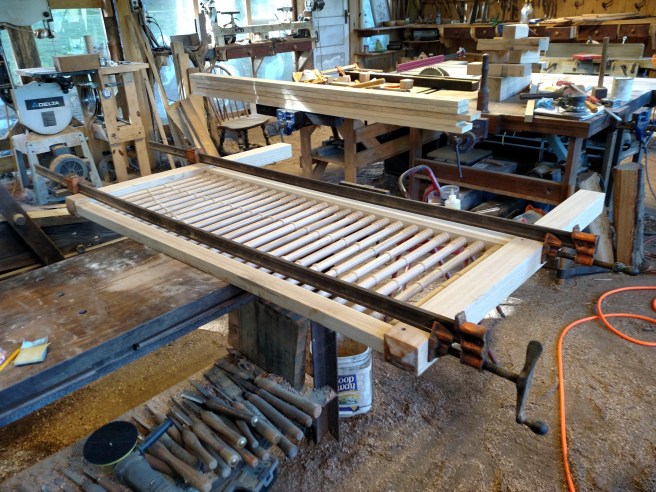
Once the pins are driven in the clamps are superfluous.
After washing off the squeezed out glue I can finish the piece right away. I use a food safe finish with no solvents, so I put it on with my hands, rub it in, leave it for about an hour, then buff it out with a soft cloth.
For each of the end panels I made 2 walnut spindles, each with 6 captive rings so that Margaret could entertain herself if she gets bored.

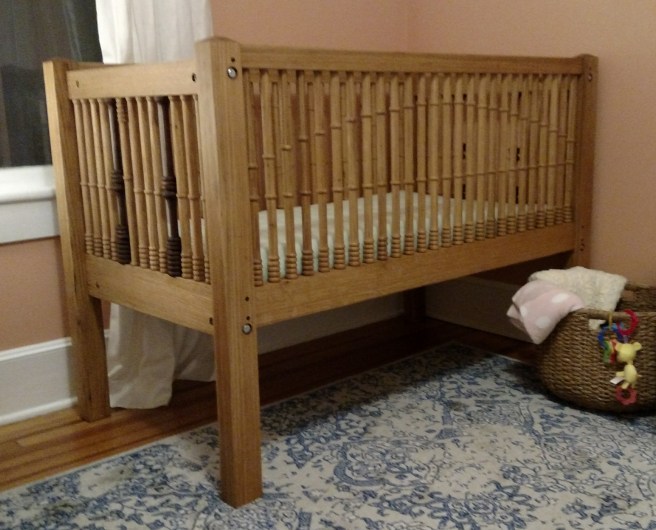
The end panels are attached using barrel bolts. You can see the bolt heads in the top picture of the completed bed. Eventually these bolt heads will be covered by little brass escutcheon plates: I just haven’t ordered them yet. When the baby gets big enough to climb out of this crib the end panels can be unbolted and discarded. The side panels will be the correct size to serve as head and foot boards for a double (full sized) bed.
